AWS CFnで基本的な構成を起動させる手順の覚書です。
本当に基本的な構成ですのでセキュリティが甘いなどはご容赦ください。
CFnへログインしてください。
管理者権限が必要です。
キーは作成済みということにしています。
コードはVSCodeで作成しています。拡張機能はCloudFormationとYAMLだけいれています。特に、↓はCloudFormationを入れていれば捗ります。
新規ファイル作成(Ctrl+O)→言語モードの変更(Ctrl+Shift+P)→『YML』→言語モードがYAMLになったことを確認。ここで名前を付けて保存しても良いかも。
startと入力して以下の一覧を入力
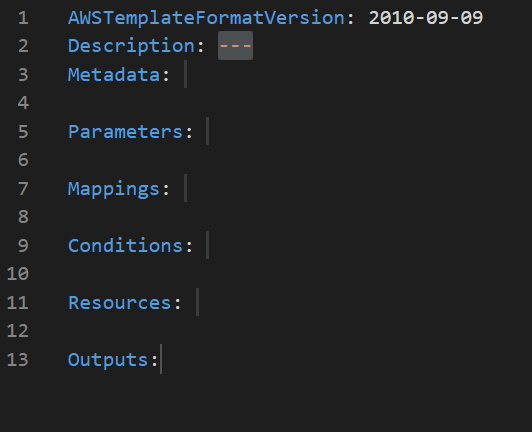
start
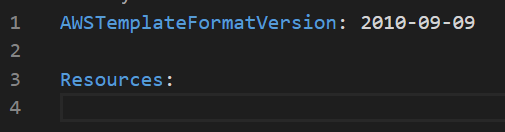
いらない部分が多いので、↓のように削る。
要するにResourcesだけにする。
start2
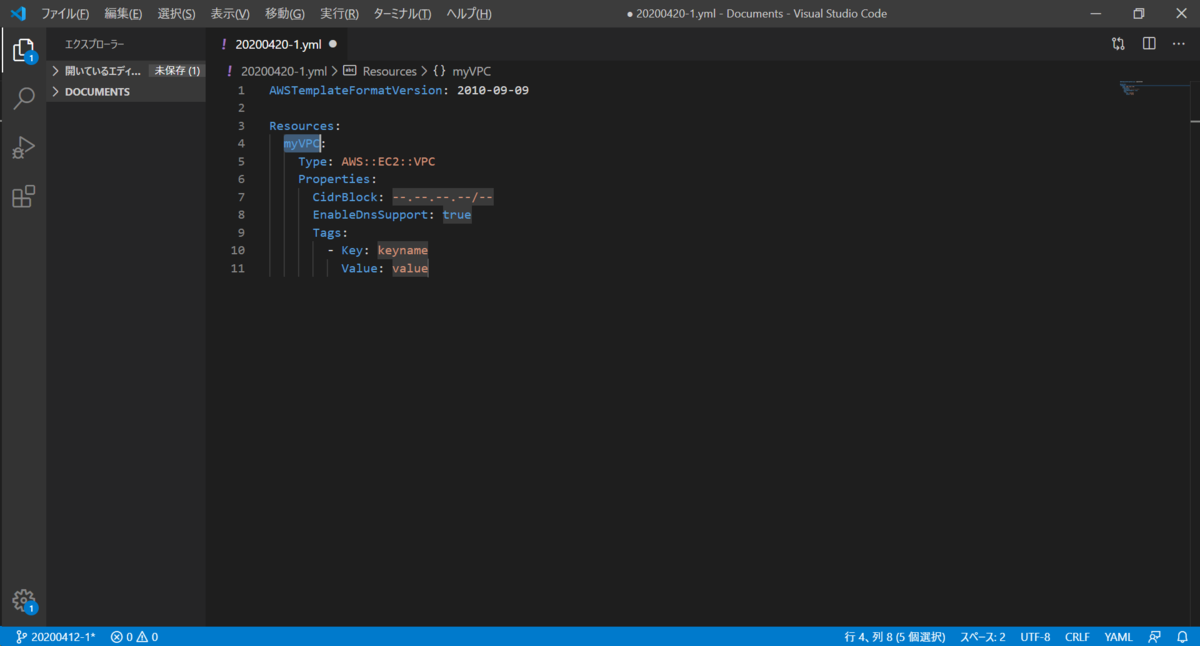
Resourcesの下の行にタブを一つ入れてVPC

vpc
vpc2
上のように一覧が表示される。
ここではCidrBlock:を編集する。私は習慣的にVPCは10.0.0.0/16とします。
それ以外がよければそちらでかまわないと思いますが、
以後はこのCidrを使いますので、これ以外の場合はアドレス範囲にご注意ください。
Resources:
Properties:
CidrBlock: 10.0.0.0/16
EnableDnsSupport: true
Tags:
- Key: Name
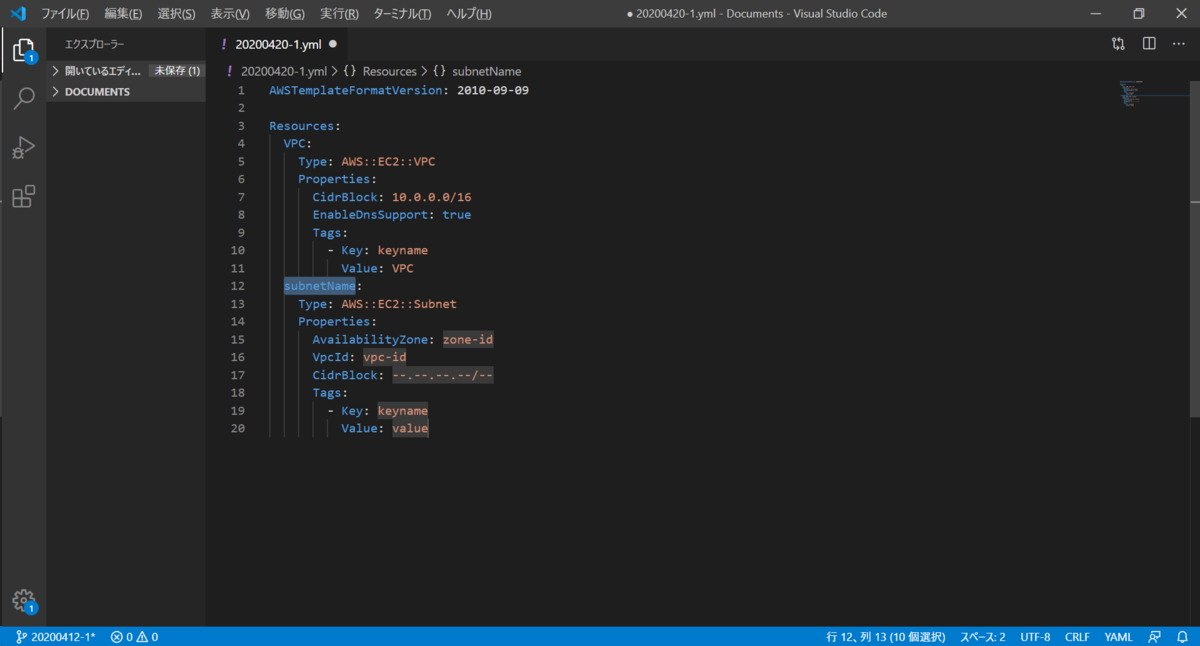
次にsubnetを作成します。

subnet1
ここではsubnet1としました
subnet2
赤文字の箇所を編集しました。
# ap-northeast-1aは東京AZです。他がよければ変えても良いとも思います。
AvailabilityZone: ap-northeast-1a
VpcId: !Ref VPC
CidrBlock: 10.0.1.0/24
Tags:
- Key: Name
Value: Subnet1
subnet1:
Properties:
AvailabilityZone: ap-northeast-1a
CidrBlock: 10.0.1.0/24
Tags:
- Key: Name
ここではこのように作りました。
ここで、一端CFnで起動してみます。
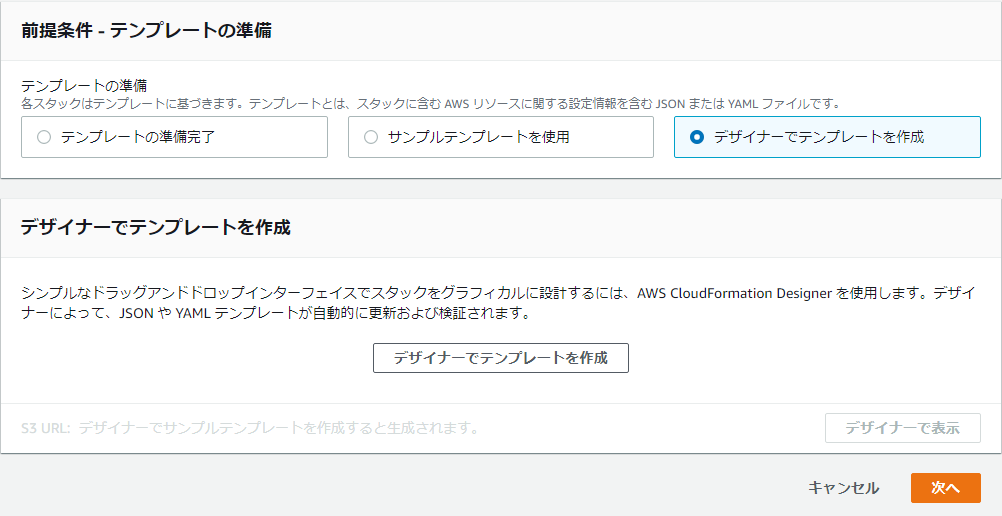
デザイナーでテンプレートを作成
デザイナーでテンプレートを作成をクリック

YML選択
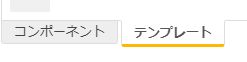
テンプレート
↑をそれぞれ選択
VSCodeで入力したコードを貼り付けてみます。
右上の『グラフの更新』をクリック

vpc+subnet
VPCとSubnetが確認できました。
とりあえず、ここまでは成功しています。
ここまでのコードです。
AWSTemplateFormatVersion: 2010-09-09
Resources:
Properties:
CidrBlock: 10.0.0.0/16
EnableDnsSupport: true
Tags:
- Key: Name
subnet1:
Properties:
AvailabilityZone: ap-northeast-1a
CidrBlock: 10.0.1.0/24
Tags:
- Key: Name
VSCodeに戻ります。
SSH接続するためのキー設定を行います。
これまで記入していたResourcesの上部にParamertersを追加して以下を記入します。
AWSTemplateFormatVersion: 2010-09-09
Parameters:
KeyPair:
Description: KeyPair Name
Type: AWS::EC2::KeyPair::KeyName
外部インターネットへ出るためにInternetGatewayを作成する必要があります。
以下のコードを入力します。
InternetGateway:
Type: AWS::EC2::InternetGateway
Properties:
Tags:
- Key: Name
AttachGateway:
Type: AWS::EC2::VPCGatewayAttachment
Properties:
InternetGatewayId: !Ref InternetGateway
InternetGatewayを入力するとattachmentまで自動入力されました。
VSCode便利ですね。
次に、Route、RouteTable、SubnetRouteTableAssociationの3つを入力します。
これはそれぞれ入力する必要があると思います。
初期状態は↓の通りです。
routeName:
Properties:
RouteTableId: rtable-id
DestinationCidrBlock: --.--.--.--/--
GatewayId: gataway-id
routeTableName:
Type: AWS::EC2::RouteTable
Properties:
Tags:
- Key: keyname
routeTableAssocName:
Type: AWS::EC2::SubnetRouteTableAssociation
Properties:
SubnetId: subnet-id
RouteTableId: rtable-id
↓になりました。
各IDを!Refで紐づけていくだけです。
項目の追加はありません。
Route:
Properties:
RouteTableId: !Ref RouteTable
DestinationCidrBlock: 0.0.0.0/0
GatewayId: !Ref InternetGateway
RouteTable:
Type: AWS::EC2::RouteTable
Properties:
Tags:
- Key: Name
RouteTableAssoc:
Type: AWS::EC2::SubnetRouteTableAssociation
Properties:
SubnetId: !Ref subnet1
RouteTableId: !Ref RouteTable
次にSecurityGroupを作成します。
これもSecurityぐらいまで入力すれば以下のようになるはず。

Security
SecurityGroupの初期状態は↓の通りです。
secGroupName:
Type: AWS::EC2::SecurityGroup
Properties:
GroupName:
GroupDescription:
VpcId:
SecurityGroupIngress:
- Security Group Rule
SecurityGroupEgress:
- Security Group Rule
Tags:
- Key:
GroupName: は削除
SecurityGroupIngress:
- Security Group Rule
SecurityGroupEgress:
- Security Group Rule
はSecurityGroupIngress:だけにします。
要するに
secGroupName:
Type: AWS::EC2::SecurityGroup
Properties:
GroupDescription:
VpcId:
SecurityGroupIngress:
Tags:
となります。
↑が
↓となります。
SecurityGroup:
Type: AWS::EC2::SecurityGroup
Properties:
GroupDescription: SG
SecurityGroupIngress:
FromPort: '22'
ToPort: '22'
CidrIp: 0.0.0.0/0
Tags:
- Key: Name
SecurityGroupはできました。
次に、このままですとグローバルIPアドレスがありませんので、外に出られません。
グローバルIPアドレスを取得するする設定が必要です。
subnet内に
MapPublicIpOnLaunch: 'true'
を入力します。
subnet1:
Properties:
AvailabilityZone: ap-northeast-1a
CidrBlock: 10.0.1.0/24
Tags:
- Key: Name
を
subnet1:
Properties:
AvailabilityZone: ap-northeast-1a
CidrBlock: 10.0.1.0/24
MapPublicIpOnLaunch: 'true'
Tags:
- Key: Name
とします。
次に、Linuxインスタンスを起動する設定を行います。
subnetの下でec2くらいを入力すると以下のようになると思います。

EC2
一番上のEC2-Instanceをエンターで選択
デフォルトは以下のようになるはずです。
myEC2Instance:
Properties:
KeyName:
DisableApiTermination:
ImageId:
InstanceType:
Monitoring: true|false
SecurityGroupIds:
- sg-id
# put your script here
Tags:
- Key: key
これもいくつかの行を削ります。
DisableApiTermination:
Monitoring: true|false:
↑2行を削りました。
myEC2Instance:
Properties:
KeyName:
ImageId:
InstanceType:
SecurityGroupIds:
- sg-id
# put your script here
Tags:
- Key: key
のようになるはずです。
ここで
KeyName:
ImageId:
InstanceType:
を
KeyName: !Ref KeyPair
ImageId: ami-923d12f5
InstanceType: t2.micro
SecurityGroupIds:
- sg-id
を
SecurityGroupIds:
- !GetAtt SecurityGroup.GroupId
を
↑は#!/bin/bashとyum -y updateの前にインデントが必要です。
ここがポイントなのですが、デフォルトでは出てこないSubnetIdを追記します。
最後に、Tagsを編集します。
を
として、IDを変えます。
そして↓こうなりました。
EC2Linux:
Properties:
KeyName: !Ref KeyPair
ImageId: ami-923d12f5
InstanceType: t2.micro
SecurityGroupIds:
- !GetAtt SecurityGroup.GroupId
SubnetId: !Ref subnet1
UserData:
Tags:
- Key: Name
これで編集は完了です。
ここまでのコードでCFnでLinuxが起動できるはずです。
最後に、全コードです。
AWSTemplateFormatVersion: 2010-09-09
Parameters:
KeyPair:
Description: KeyPair Name
Type: AWS::EC2::KeyPair::KeyName
Resources:
Properties:
CidrBlock: 10.0.0.0/16
EnableDnsSupport: true
Tags:
- Key: Name
InternetGateway:
Type: AWS::EC2::InternetGateway
Properties:
Tags:
- Key: Name
AttachGateway:
Type: AWS::EC2::VPCGatewayAttachment
Properties:
InternetGatewayId: !Ref InternetGateway
Route:
Properties:
RouteTableId: !Ref RouteTable
DestinationCidrBlock: 0.0.0.0/0
GatewayId: !Ref InternetGateway
RouteTable:
Type: AWS::EC2::RouteTable
Properties:
Tags:
- Key: Name
RouteTableAssoc:
Type: AWS::EC2::SubnetRouteTableAssociation
Properties:
SubnetId: !Ref subnet1
RouteTableId: !Ref RouteTable
SecurityGroup:
Type: AWS::EC2::SecurityGroup
Properties:
GroupDescription: SG
SecurityGroupIngress:
FromPort: '22'
ToPort: '22'
CidrIp: 0.0.0.0/0
Tags:
- Key: Name
subnet1:
Properties:
AvailabilityZone: ap-northeast-1a
CidrBlock: 10.0.1.0/24
MapPublicIpOnLaunch: 'true'
Tags:
- Key: Name
EC2Linux:
Properties:
KeyName: !Ref KeyPair
ImageId: ami-923d12f5
InstanceType: t2.micro
SecurityGroupIds:
- !GetAtt SecurityGroup.GroupId
SubnetId: !Ref subnet1
UserData:
Tags:
- Key: Name
雰囲気くらいはおわかり頂けますでしょうか。
↑はコピペできますので、CFnで起動してみれば感じはおわかり頂ると思います。
うまく起動できない場合は、!Refの後ろの名前が、コードの中にあるか検索してみてください。
詳しくはググって欲しいのですが、!Refの後ろの名前はコード内にないとエラーになります。
デフォルトの名前を変えずにいるとエラーになると思います。
コードの行間がおかしいです。
見づらくてすみません。